| Home |
| Who We Are |
| Save The Parrots |
| Books |
| Links |
| Volunteers |
| Articles |
| Avian Vet Listing |
| Email Us |
As published in BirdBreeder February l996
Box 13, Point Arena, CA 95468 USA
PH: (213) 819-1723
macaws@parrotpro.com
Each year before breeding season, we review our previous years' notes, to see what we should change in order to improve that which we think we are trying to do. We check and update diets, nestboxes, unproductive relationships, baby formulas, perch positions, misting systems, neighbors, incubators, thermometers, hygrometers, grain suppliers (all grains have to germinate), produce suppliers, and outside disturbances. We also find it important to check with fellow aviculturists about their current successes and failures, and try to incorporate their successes into our breeding program. All of this has a great bearing on egg production and you have to have viable eggs; that is what incubation is all about. When one thinks they have everything under control and is settled into a routine that does not need changing, you are depriving yourself of possible future successes that could be easily attained. Many years of experience have taught us to keep an open mind about birds.
PARENT BIRDS
Adult birds must be in both good physical and mental condition prior to being able to produce an incubatable egg. That is to say, an egg that is both fertile and has the proper chemical balance to produce a healthy chick. Your pairs must be psychologically compatible, and physically comfortable, before a successful breeding will take place.
The adult birds diet should contain the proper amount of vitamins and minerals and proteins to satisfy their own nutritional needs before they can give off the extra energy necessary to form viable sperm or an egg.
Our parent stock are fed a wide variety of fruits, vegetables, nuts, greens, all fresh and in season. Three days a week we feed turkey, chicken, beef or pork. (Something that would taste good to you.) Parrots have more taste buds than any other birds. Four days a week, in the mornings again, we feed a quality Dog Chow which has been heated sufficiently to kill all bacteria (like salmonella, E. Coli) and cooled to room temperature before serving. Monkey chow can be treated in the same manner. Don't forget to cook it. A few years ago, Arthur Freud, editor of American Cage Bird Magazine, called us in somewhat of a panic to find out what we knew about it; he had just learned that there were excessive amounts of E.Coli and Salmonella bacteria in that product. This was nothing that would hurt a monkey, or a parrot after it has been microwaved and properly cooled.
We neither recommend nor feed dog chow or monkey biscuit to anything but adult birds. The powdered vitamin and mineral supplements easily adhere to the warm dog chow. Dont feed it hot. The fruits and vegetables are also served in the mornings, as much as they will eat, plus a little extra to ensure that they are full. Nuts are fed in the winter months. Every afternoon the food trays are cleaned of any excess morning rations, and safflower, along with soaked corn is fed.
A constant supply of clean drinking and bathing water is a must for successful incubation . The humidity in the nest is adjusted by the parent birds as they carry water to the eggs on their soaked feathers. In our arid climate this is a common occurrence with our birds. If a large enough bathing bowl is not provided, the eggs can become dry and won't properly incubate.
INCUBATING EQUIPMENT
The absolute best, most efficient, and most desirable incubator one could possibly have is an experienced, cooperative happy mother bird with a loving father bird to attend her every need. Our experience shows that a parent incubated chick is always heavier, more robust, and develops more quickly than one raised in an artificial situation. If you can leave a chick in the nest until it is 3 weeks old, the hardest part of your job will already be accomplished.
My second choice for an incubator is an experienced brooding Bantam or Silky chicken. You don't have to worry about power failures, humidity, or turning the eggs. It is all done for you. I have been known to keep one in a pet carrier in my bedroom, just to keep a good eye on it. Letting them out twice a day for just 5 minutes allows the chicken time to scratch around, and gives the eggs the time required to cool. When the babies start to pip, they must be removed to an artificial incubator, because a chicken wont feed a parrot.
Our next choice would be a mechanical incubator. This can be either an inexpensive Styrofoam still air model, or a more sophisticated forced air type. Both are readily available through Bird Breeder advertisers. The amount of money you spend on an incubator is not as important as the attention paid by the operator to the project. It is important to understand that a Psittacine egg, unlike that of a Galliforme or a common chicken, cannot stand the abuse of a mechanical egg turning unit. To successfully incubate, we turn our eggs by hand seven times a day, using two sterile Q-tips as fingers. If they are turned with your fingers, by the end of the 15th day you have touched them at least 115 times and are filling the pores with grease.
A mark with a number two pencil indicating date laid and position for turning is necessary both for knowing when to adjust the humidity and last turning position. The eggs are turned an odd number of times to insure that the embryo rests on a different part of the shell each night. This prevents them sticking to the shell. I start turning at 7 am and finish at 7 p.m.. My eggs are kept with the large end up about 30 degrees just like our parent birds keep them.
THERMOMETERS AND HYGROMETERS
A thermometer measures air temperature, and should be of a certified variety. This means that it is guaranteed to be accurate. Your chicks' life depends upon it. A hygrometer measures the humidity and gives you a direct reading of the percentage of relative humidity in the incubator. We had a particularly difficult time finding one, as we wanted one with a direct dial readout. We finally found it at the PERRY EQUIPMENT CO., 501 S 5th Street, Phoenix, AZ. Telephone 602 253 0027. We bought the Abbeon -Cal model, as it was the only certified, calibrated model sold in the U.S. They do have other models, but I cannot attest to their accuracy.
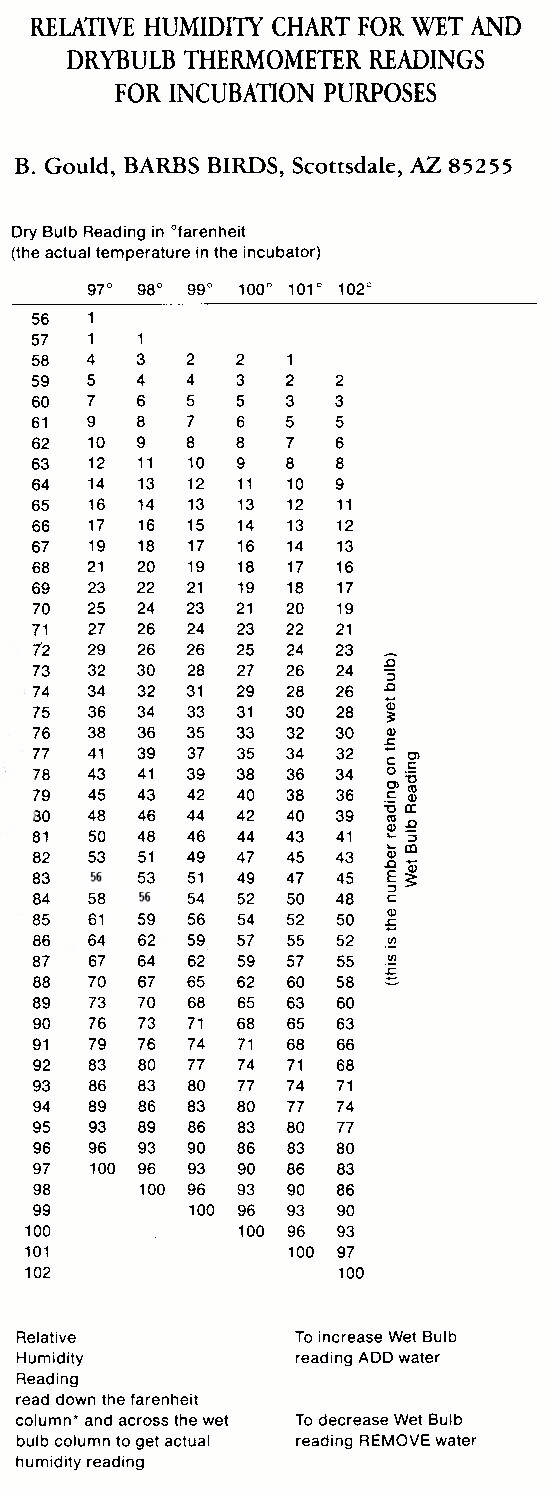
A wet and dry bulb thermometer combination can be used to measure the relative humidity. This is more complicated than using a hygrometer. A wet bulb thermometer is a thermometer with a wick on the bottom sitting in a pot of water, measuring the temperature of the water in the incubator. A dry bulb thermometer is a regular thermometer, measuring the air temperature in the incubator. The wet bulb/ dry bulb temperature readings can be converted to actual humidity with the aid of the following chart.
Dry bulb reading in Fahrenheit (the actual temperature in the incubator), read left to right, 97 degrees. to 102 degrees, on the top line of the chart.
Wet bulb reading in Fahrenheit read top to bottom of first column of chart, 56 degrees to 102 degrees.
Relative Humidity Reading is calculated by reading down the wet bulb column and across to the dry bulb column. Example: an 82 degree wet bulb and an actual temperature of 100 degrees give you an accurate humidity reading of 47percent.
WET BULB / DRY BULB CONVERSION CHART
CANDLERS
The egg candler is used to see the inside of an egg. It is similar to an X-ray, and carries about the same risk. A simple candler can consist of a piece of cardboard with a hole, slightly smaller than your egg, cut out in the center, and a shaded light bulb. To use the candler, hold the egg over the hole in the cardboard, and place both pieces over the light bulb. Not too close!! A more expensive one for chicken eggs is available at most any feed store. It consists of a light bulb in a can with a hole on one end. Not too hi-tech, but very efficient for seeing the eggs that are easily accessible, like the ones in your incubator.
Don’t keep it on the can too long, or you can cook the egg. The third type is my favorite for checking nest boxes. It is a wand with 3 batteries and a high intensity light bulb on one end. It is about 18" long. I use mine when inspecting eggs in the nestboxes, without having to remove them. Dont cook the egg with this one, either. That is available through MDS Services, Inc., P O Box 1441, Brandon, Florida. Phone 813-653-1180. You can find a picture of it in BirdBreeder. We found it necessary to reinforce ours, simply by slipping it inside a piece of 3/4 inch schedule 40 PVC pipe, sure helps when a three pound macaw is hanging on the other end of it, defending its nest.
SCALE
You will also need a gram scale. This is for weighing eggs throughout the incubation period. It is best to have one with small cups, so that the eggs don't roll off. Embryos inside the egg do kick and move, towards the end of the incubation period, and easily roll off a flat scale----splat!! There are 3 types of gram scales available today. There is a two-platform scale that comes with weights. The egg is placed on one side, and the weights placed on the other until an equal balance is achieved. The second type is a triple-beam that involves no loose weights. You put the egg on the platform and slide the weights along the beam until balance has been achieved. The third type is a new and fancy digital readout electric type. This gives you a direct weight reading.
HOW TO USE YOUR EQUIPMENT
Prior to placing your eggs in the manual incubator, it should be in a sterile condition. Start by running the incubator before you need it. We run ours for at least three days, checking to see that is maintains temperature in the location we have selected. Three to five thermometers should be placed at various locations inside, as all incubators have hot and cold zones. It should be in a room that does not fluctuate vastly in temperature. It would be unrealistic to expect even the most expensive incubator to maintain an accurate temperature against a great fluctuation of day to night weather.
It should not be placed where sunlight can shine on it directly. It should not be next to a heater or fireplace, or in the draft of an air conditioning unit. If you are not an experienced" incubationist" find some fertile chicken eggs and PRACTICE. Run two or there batches through, so you feel confident in your ability and at ease with your new equipment.
MONITORING THE EMBRYO DEVELOPMENT
Having all this equipment allows you to calculate the loss of weight which occurs during incubation. A macaw egg will lose 16% of its "fresh" weight during the 26 to 28 day incubation period. If your is losing weight too rapidly, you must increase the humidity and lower the temperature. If it is not losing weight , you would decrease the humidity and adjust the temperature. For example:
Weight of an egg when fresh (Blue&Gold): 33grams 800mg
Projected 16% weight loss: 5grams 300mg
--------------------------------------------------------------------
Projected weight at hatching (26 days): 28grams 500mg
Projected total loss is divided by the number of days to incubate; 5grams300mg divided by 26 equals a daily loss of 200 mg, or 1/5 of a gram. There are 1000mg in a gram.
THREE MAIN PARTS OF AN EGG
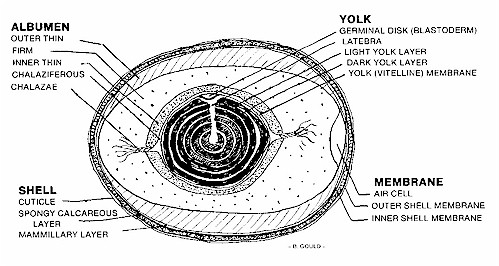
YOLK SAC: This structure is connected through the umbilical cord, and contains blood vessel. The utilization of the yolk is gradual at the start of incubation, and is greatly accelerated during the last 5 days. At the beginning of hatching, 25 to 35 percent of the yolk remains unused; this is drawn into the body of the chick , through the navel, just prior to hatching. There, it is absorbed during the first week of life outside the shell. Its function is nutritional. Its walls absorb food materials from the albumen into the blood vessels, to provide nutrition to the embryo. This actually is a diverticulum (part of) the small intestine.
AMNION: This sac develops a bit faster than the allantois, surrounds the embryo, and is filled with fluid. This serves to cushion the embryo against mechanical injuries, and protects from dehydration or from sticking to the shell . Some of this fluid is swallowed by the embryo in the last states of development.
ALLANTOIS: This is a respiratory organ. Its blood vessels carry oxygen to the embryo and remove carbon dioxide. The kidneys also excrete their products into the allantois. The amount of total solids in this sac increase 4.5 times in the first and second week, and organic material increases 9 times. The fluid becomes more acid as development proceeds. At the time of hatching the pH has gone from more than 8 to less than 6. The increase in acidity is the result of the function of the sac; respiration and excretion. The accumulation of carbon dioxide creates a change in the pH. During the last week of incubation, the increased excretion of uric acid makes for an increase in the organic matter that you see after hatching. As the fluid grows more acid, and the uric acid is no longer soluble, it is deposited on the walls of this sac. Urea, creatinine and ammonia (other waste products) are also contained in this sac. This is the whitish - greenish looking stuff that is attached to the far end of the umbilical cord. As the cord dries up and falls off, this stays in the shell.
HATCHING
The actual process of hatching begins days before you see the chick. First, they break a hole through the inner membrane into the air sac area. The first sign of this that you will see is a tiny star shaped pushed up hole, about 1/8 inch across. You should candle at this point to make sure the head is in position at the UP end of the egg, and double check your angle -- remember the 30 degrees -- adjust the humidity from 65% to 77%, and get ready to wait. Sometimes, if you are careful when you candle an egg, before it starts to work its way out of the membranes and into the air cell, you will see that the shape of the air cell appears to be wavy, and this is the baby pushing as it gets into position to push through the membrane. If you listen very carefully then, you will hear faint ticking sounds. If you are anxious, leave the lid on the incubator and keep checking through the view port. In my experience, the egg will get a pip crack, and twelve to 16 hours later you will hear the tiny beak pecking away from the inside, first faintly and then gradually louder. After 24 hours of this, during which time the pip hole may not be getting any larger, you should hear a tiny peep. This indicates that the lungs are now working, and the chick is drawing air.
Several more hours will pass, and soon you will see the pip hole moving over to the side, or even the appearance of a few more holes spaced a bit apart. This can take 24 hours, more or less.
The chick is rotating now, and making a "line" of tiny cracks which will eventually circle the large end of the shell. This is kind of like opening a soft boiled egg that is to be eaten from an egg cup. If he is opening from any other part of the shell, he will need human assistance.
I routinely keep hatching notes on individual eggs; one that is pretty close to normal has started really working hard after 45 hours, counting from the first pip crack.
It is important not to assist in a normal hatch, and in an abnormal hatch it is important not to assist too quickly. By this I mean don't just crack the egg and rip the chick out. If you are in a hurry and help the baby out prematurely, the yolk may not be reabsorbed, and you can kill the baby. They seem to need to work hard for a long time to hatch healthy and strong and have properly absorbed the yolk sac.
Should the baby appear to be stuck to the shell membranes, a drop of sterile water to the dried membranes can relieve this. This would be at the stage of hatching where the shell is completely broken, the baby is clearly visible, just stuck. Make sure not to get it in the baby's face. Total time for hatching can take 48 hours or more, you must be patient.
The pecking reflex that causes a chick to pip is brought on by a lack of oxygen and an excess of carbon dioxide inside the shell. Again, if you break the shell prematurely, the proper pecking action won't take place, and you will get a very weak chick. . If you feel that the chick has taken an excessive amount of time to hatch, and you can see that the yolk sac has been reabsorbed, don't be afraid to feed the chick while he is still partly in the shell.
After your baby hatches, you will see a large area on the back of the neck, about the size of a pinto bean, that appears very soft and full of fluid. It is. This is normal, and gradually the excess fluid is drawn into the body. Do not let an overzealous practitioner lance it for you. You would not believe how many people have called me to explain what their vet did. All during hatching, systems are changing from their little enclosed environment to one of air and movement. The lungs are now functioning, and the yolk sac is being absorbed through the umbilicus into the abdomen. After hatching, you should be able to see the yolk right through the stomach wall. The umbilicus will be a little swollen, and a blood vessel will still be attached. Do be very careful not to damage this. In a few days it will fall off by itself. There will often be greenish matter left over in the shell, this is also quite normal.
INCUBATION TROUBLESHOOTING
(University of Kentucky, Agricultural Experiment Station, Poultry Division)
|
|||||||||||||||||||||||||||||||||||||||
As you can see from this chart, most problems are caused by either faulty equipment or faulty handling. Be 100% perfect in our techniques and most of these problems will be eliminated.
References:
Laboratory Manual and Text Book of Embryology: Charles William Prentiss, l921
Fertility and Hatchability of Chicken and Turkey Eggs; Lewis W. Taylor, University of California, Berkeley
Harem, Barbara and Geoffrey Gould 1995